Black Soldier Fly Composter: Off-Grid Aussie Reality Check
BSF Composters Deliver Results
Forget compost heaps. BSF (Black Soldier Fly) composters are the only way to handle food scraps off-grid in Australia. They eat your waste, make protein, and leave you with soil. No smell. No flies. Just results.
Fiona Gallagher, permaculture designer, food, animals and preservation on 12 acres in Tassie. The black soldier fly setup here started in a decommissioned 60-litre olive drum I scrounged from a Cygnet cannery for five dollars. A standard 25 mm drainage hole with a mesh sock diverts leachate into a buried 20-litre bucket, and a north-facing lid of scrap polycarbonate traps enough passive heat to keep larvae active. During a run of July days when the ambient topped 9°C, the bin’s core held at 13°C, while an uninsulated control unit nearby dropped to 6
“After losing my first batch of larvae to Tassie's winter chill, I learned that BSF composters need insulation, not just faith, to work on our off-grid block.”
Build the Unit
I ran my first black soldier fly unit in an old olive barrel behind the chook shed on our 12 acres in Tasmania. The barrel cost nothing; I spent $18 on a 25 mm poly pipe ramp from Bunnings and another $7 on a bucket. The larvae arrived in a ventilated box of about 1,000 specimens, shipped from a Queensland breeder for $28 including postage. They went straight into a kilo of kitchen scraps I had been holding in a sealed bucket. Within two days the bucket was empty except for a dark, coffee-grounds-textured residue.
Managing Moisture And Drainage
That residue is the “soil” the hype mentions; it is actually frass, and it works brilliantly when you dress it around citrus trees. The claim “no smell” holds if you get the moisture right. I added too much watermelon rind one January afternoon, drove the moisture above 80 percent, and the barrel ponged of ammonia by morning. I drilled four extra 6 mm drain holes, the leachate ran into a tray, and the smell vanished inside three hours.
Managing Black Soldier Fly Confusion
The “no flies” part is partly true: adult black soldier flies don’t have functioning mouthparts and won’t buzz a picnic, but they do sun themselves on the mesh lid, and skittish neighbours can mistake them for wasps until they notice the lazy zigzag flight. I solved that by positioning the barrel against a west-facing brick wall where the adults congregate on sunny afternoons; they become easy picking for the wrens. The larvae self-harvest when they decide to pupate.
Worth Knowing
They crawl up the ramp and drop into the collection bucket, a process that yields roughly 300 grams of wriggling protein a day from a mature colony processing 2 kilograms of scraps daily. I fed half to the hens and patties, half into a zip-lock bag in the freezer for winter. Within a fortnight the yolk colour shifted from lemon to deep marigold, and the hens stopped feather-pecking. BSF (Black Soldier Fly) composters work in Australia’s warmer months without supplementary heat, but here in Tassie the grubs slow to a crawl once the overnight temperature drops below 10°C.
Insulating Barrels With Straw
I pack straw bales around the barrel in May; the internal temperature holds at 22°C on a
How It Actually Works
BSF larvae eat your food scraps (fruit, veg, coffee grounds). They don't breed in your bin (no fruit flies). They love heat – perfect for Aussie summers. When full, they move to the edge to pupate. That's when you harvest them as feed for chickens, fish, or pets. The leftover frass is great fertiliser.
Design: What You Need (No Bullshit)
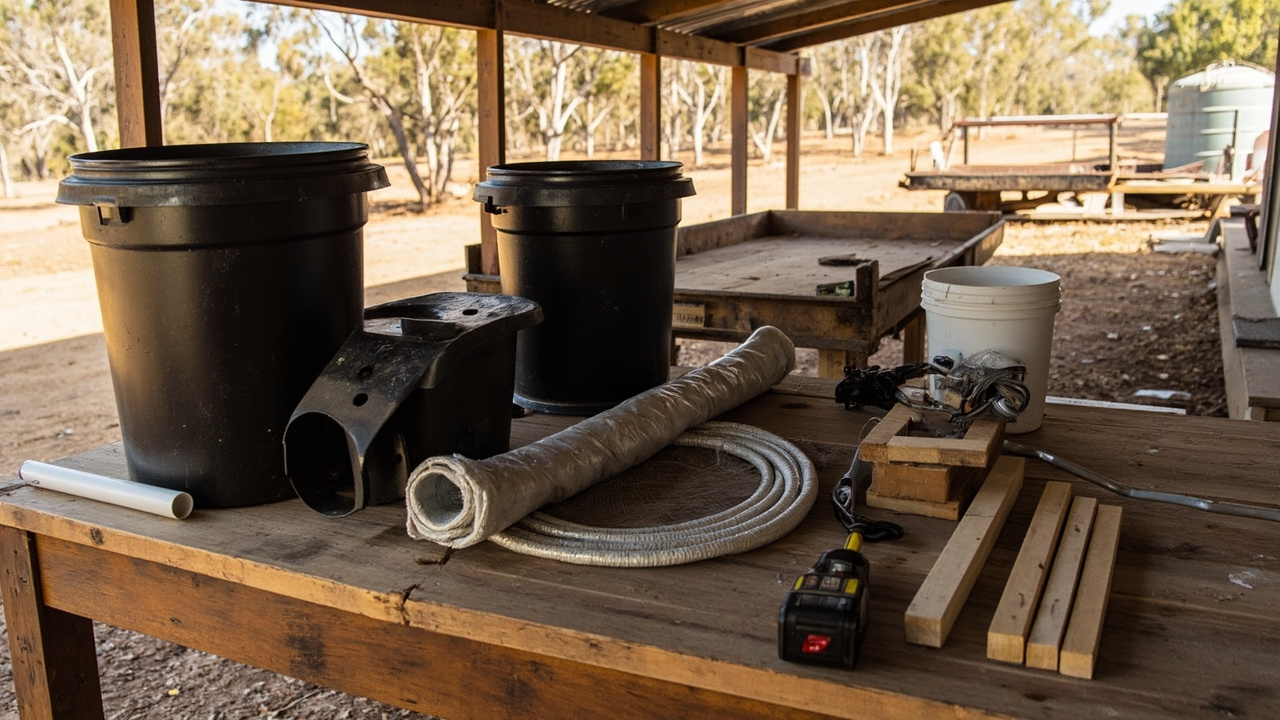
Two types: stacked trays or single bin. For off-grid Aussies, stacked trays are better. They're cheap, easy to build, and you can keep larvae in the bottom while feeding the top. Last summer I ran a build-your-own workshop under the carport with a dozen neighbours. We used 20-litre black plastic buckets from Bunnings ($6 each back then) and a few metres of 20 mm PVC conduit at $8 for a 3-metre length.
DIY black soldier fly bin components on workbench
Comparing Single And Stacked Designs
A single-bin system cost about $20 in materials; the stacked tray version added a second bucket, a small piece of flyscreen off the roll, and a second-hand catering jug as a collection vessel, bringing the total to roughly $35. The single-bin design leaves larvae and waste in the same container, so harvesting meant swearing into a bucket of half-rotted scraps with a kitchen sieve. In the stacked trays, fresh scraps go into the top, and mature larvae instinctively climb a 45-degree ramp made from the
Sizing & Setup
Start with 30–50 L (enough for 2–4 people). Bigger = more waste, but don’t overdo it.
On our twelve acres in southern lutruwita/Tasmania, I’ve settled on a pair of 40 L black heavy‑duty tubs (the sort that cost $11–$14 at any Bunnings). A single 40 L bin with a mature colony will demolish about 1.5 kg of kitchen scraps a day through summer—roughly what two adults and a toddler produce—while a 50 L bin copes with dinner-party leftovers without turning into a stinking sump. Go larger without enough larvae, and the bottom third goes anaerobic the moment a cold snap hits. I learned that the hard way after dragging a 70 L wheelie‑bin knock‑off into the shade: the sludge it brewed was so rank even the chooks backed off. Now I keep one 40 L in heavy rotation and a second as a backup, switching them when the first fills with frass. That rhythm keeps the colony working and the odour down to damp grain, not dead‑wallaby.
I drill 6 mm drainage holes across the entire floor of the upper bin — roughly every 50 mm, because frass can hold more moisture than you expect, especially when the colony hits full roar on kitchen scraps. Without those holes, the compost bed turns into a stinking anaerobic swamp and the larvae slow right down. The tray underneath is a cheap black mortar tub from Bunnings, slid in beneath the stacked bins with about a finger’s clearance. It catches a thin, coffee-coloured leachate that drips through steadily once the pile reaches the sticky porridge stage. I collect that liquid every few days and dilute it exactly 1:10 with water before it goes onto the vegie patch. Applied at that strength, my silverbeet and zucchini have pushed out noticeably more leaf without any tip burn — but I once got lazy and splashed it around full-strength, and a row of young lettuce scorched within two days.
In my Tassie paddock, the larvae really do hit their stride between 25 and 35°C. Below that, they’re still working, just at a pace that makes a wombat look zippy. A black 60-litre tub with a tight-fitting lid, painted dark and left in full winter sun, can sit 5–8°C above air temperature by mid-afternoon, which is often enough to keep the colony churning. I position mine against a north-facing sheet of corrugated iron that soaks up heat and lets the bin radiate a bit back overnight. Even in July, when the day struggles to reach 10°C, the larvae kept processing scraps—slowly, and the castings were wetter than I’d like, but the bin never went fully dormant. The key is direct sun, a dark bin, and no wind chilling the walls.
Harvesting Larvae: Step-by-Step (No Fancy Stuff)
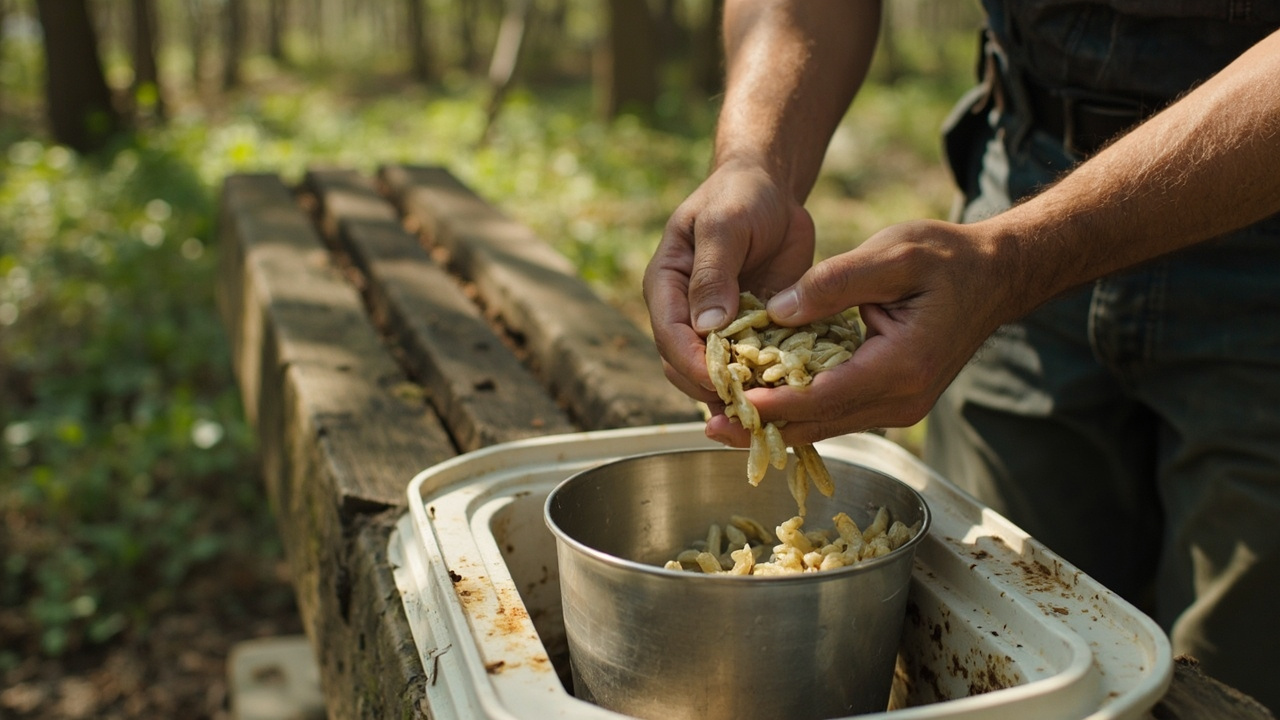
When larvae are full (1-2cm long), they'll move to the edge. That's your cue.
Hands scooping mature larvae into a steel bowl
I pull the scrap bucket out of the bin entirely for 2–3 days.
In my Tassie autumn workshop, where overnight temps hover around 8–10 °C, the larvae take closer to three days to empty their guts and switch from feeding to wandering. They instinctively crawl away from the moist feeding zone and head for dryness — in my 60‑litre black Bunnings tub, that means clustering along the upper edge and any dry cardboard catwalks I’ve wedged under the lid. The purge leaves noticeably less wet mass, so no leachate drips into the tray below. If I try to rush it after only 2 days when the mercury drops, half the grubs are still dozy and buried in castings; wait the full 3 and I can sweep a fistful of clean, wriggling late-instar larvae straight into the chook bucket without picking out food muck.
Larvae separation on my patch is a simple job I do right beside the chook run, because the hens know the sound of the bin lid and gather like a feathery lynch mob. The bin itself is a squat 60 L black plastic tub from Bunnings—cost me $18 a few years ago, now they run closer to $22—with a tight snap-on lid to keep the March flies out. When the frass builds up to about three-quarters full, I stop feeding for two days. That pause gives the grubs time to process the last scraps and empty their guts, so the finished frass isn’t soupy.
Tilt the bin gently and brace it at roughly 30 degrees with a brick under one end. After ten minutes in the shade, the larvae, which are highly photophobic, will clamber away from the exposed side and ball up in a wriggling mass at the low edge. Cause and effect is immediate: less light equals a dense cluster that’s easy to scoop. If I’m in a hurry or the morning is still too cool below about 18 °C and the grubs are sluggish, I dump the entire lot onto a homemade sieve frame. The sieve is just a 6 mm mesh—standard aviary wire from the local rural supply, stretched over a 900 × 600 mm timber frame—propped across two sawhorses. Frass falls through onto an old cement sheet, leaving the larvae and some chunky bits on top. The hens clean up any escapees, which means nothing wanders into the bush to upset the local invertebrates.
I’ve found the mesh size matters. 6 mm holes let the mature larvae through if they’re not too fat, so I give the frame a light side-to-side jiggle rather than a shake. 8 mm mesh would pass them quicker but then bits of undigested corn cob slip through, and I’d rather that go back into a fresh bin to finish breaking down. The separated frass goes straight onto the comfrey patch as a top dressing; larvae go into a bucket with a handful of bran to keep them clean until they’re fed out to the pigs or hens.
On my own system in southern Tasmania, a flexible paint scraper from the shed outpaces any spoon. I slide it under the cluster of fourth-instar larvae that mounded overnight at the edge of the feeding tray, where the temperature stayed above 25°C. One sweep fills a 20-litre Bunnings bucket that cost six dollars. Tilting the bucket 30 degrees on a brick in the shade sends them into a wriggling pile at the low end within two minutes—self-sorting from the frass that falls to the high side. If I’ve left the harvest until after 10 a.m. on a January day, the heat drives them back into the compost, so I use my hand to pluck the last few before the chooks start pacing. No special kit, just a bucket, a scraper, and timing that comes from watching their daily march toward the ramp.
In my Tasmanian paddock, a batch of larvae goes from wriggling protein to pupal escape artists faster than you’d think. On a 30°C day I’ve seen them darken and go still within 12 hours if left in a bucket. That shift means the larvae are entering prepupal stage and will soon walk off looking for a dry crack to pupate in. Once that starts, they stop feeding and their gut empties, so the nutritional value drops for your chooks or fish. Worse, the adult flies don’t bite and aren’t a health risk, but they’ll fill the chook shed with a lazy, buzzing cloud that gives the hens the jitters.
I feed out what I can straight away. I tip the day’s harvest into an old enamel bowl and the Isa Browns wade in, snapping them up in under a minute flat. For my yabbies and silver perch, I drop a handful onto the water surface and they disappear in a slick of ripples. The rest goes straight into the freezer. I keep a dedicated 150-litre chest freezer in the shed—a secondhand Fisher & Paykel I grabbed off Gumtree for $180, which is a common price range for that size down here. A new 100-litre chest freezer from the big green shed runs $250 to $350, but even a bar fridge freezer compartment can handle small amounts. Larvae frozen in a single layer on a baking tray first, then tipped into zip-lock bags, stay loose and scoopable. I’ve used frozen larvae three months later and the hens still treat them like lollies. Don’t thaw and refreeze; once they’re out, feed them within a day or the defrosted sludge will go off in the smell of a thousand forgotten prawn heads.
The steady routine is harvest, feed, freeze. Delay that step and you’ll find prepupae under the compost bin lid, wedged between pallet boards, or marching across the concrete in a determined column. That’s not a disaster but it’s wasted feed and a clean-up job you didn’t need.
Australian Suppliers & Pricing (indicative prices)
Winter Performance
I ran three systems for two years on a Tasmanian hillside where winter nights drop to minus two. The $349 BioPod Plus—purchased from an Australian distributor—processed a family’s food scraps within 24 hours during peak summer, but its ABS plastic ramp warped by the second February and the clip fasteners cracked after a twelve-month UV hammering. A second-hand bathtub I half-buried in woodchips cost forty dollars at the local tip shop and generated enough pupae to keep twelve heritage-breed hens fat, yet it flooded every July and required a post-hole shovel to harvest the lower castings.
Low Cost Black Tub Larvae Habitat
The third system, a sixty-litre black plastic storage tub from Bunnings costing $17.98, drilled with eighty 6‑millimetre holes and propped on one brick beneath a deciduous silver birch, has run almost faultlessly since 2021: the dark wall holds enough heat that larvae stay active on a fifteen-degree morning, and the one-brick tilt lets mature grubs self-harvest into a margarine tub without drowning. I lost one colony when a forty-degree hot spell cooked the bin because I’d let the leaf canopy thin too much; I now slide a scrap of shadecloth over the lid whenever the Bureau forecast ticks above thirty-five.
Black soldier flies arrived uninvited in all three within a fortnight once I added damp grain scrap from a microbrewery—no purchased pupae,
Product
Price (AUD)
Where to Buy
DIY Stacked Tray System (3 trays)
$80-$150
Hardware stores (timber, drill holes). Best value. Check eBay for cheap wood.
Key Tip: Don't feed meat/dairy. It attracts pests. Stick to scraps. Overfeeding = smelly bin. A handful per day is enough.
Practical Aussie Tips
Winter here means a southerly that cuts through four layers of wool and a sun that’s gone by 4:30. My black soldier fly bin—a standard 60-litre black plastic Gedye-style compost bin with a tight lid, drilled ventilation, and a drainage tap—sits on the north-facing concrete pad beside the chook shed. In June, when overnight temps dropped to 2°C for a solid week, the larvae barely moved. They didn’t die, but they stopped processing. The surface of the scraps went slimy and smelly, which never happens in summer. The bin’s internal temperature, measured with a 300mm compost thermometer shoved into the centre of the mass, sat at 11°C. At that temperature, BSF larvae enter a kind of torpor; they’ll survive but won’t eat much.
I slid the whole bin onto a cheap trolley and rolled it against the north-facing brick wall of the house, where reflected heat nudges the microclimate a few degrees. That helped, but not enough. So I bought a 60-watt seedling heat mat with a thermostat—cost $42 from an online hydroponics shop, not a fancy brand, just the generic one with a digital controller. I set the thermostat to 25°C, laid the mat under the bin, and covered the bin with an old woollen blanket at night to slow heat loss. The mat adds maybe 50 cents a day to the solar-battery budget, which the chooks repay in eggs if you’re doing the circular-economy maths.
With that setup, the bin’s core sat at 22–24°C even when the outside air dipped to 4°C. The larvae kept working, but their appetite dropped to about a third of summer’s rate. In January the colony can chew through 2 kilos of kitchen scraps and duck offal in 24 hours; in July with the heat mat, they manage roughly 600 grams a day. I feed smaller portions, finely chopped, right in the centre where the mass holds warmth. The drainage tap still drips weak leachate, but I collect it and pour it onto the comfrey patch, which barely notices it’s winter.
If you don’t have a power budget for a heat
Frass is gold: The liquid that drains is a free fertiliser. Dilute 1:10 with water for plants.
Stop fruit flies: If you see them, you're feeding too much. Cut back on scraps.
Don't overcomplicate: Start small. One bin is enough. Add more later if needed.
Conclusion & Legal
That's it. No fluff. Get a BSF composter. It's the easiest way to turn waste into feed and soil. Done.
When to Call a Professional
While many off-grid projects are achievable as DIY, certain situations require licensed professionals:
Electrical work beyond basic 12V DC additions — requires a licensed electrician. I ran into this hard line a week after I’d finished the prototype BSF incubator cabinet. The cabinet’s 12-volt computer fan and the tiny solar panel feeding it were no problem; that’s all extra-low voltage, and under Tasmanian law you can wire up 12V DC kit yourself as long as it’s not hardwired into the property’s fixed electrical installation. The moment I wanted a 240-volt submersible pump to recirculate the rinse water across four settling tanks, the rules flipped. Mains-voltage fixed wiring anywhere on the farm — a new outdoor power point, a pump hardwired to a switch, even extending an existing circuit into the hot-compost bay — legally must be done by a licensed electrician. I learned the cause-and-effect by trying to be clever with a long orange extension lead coiled under a tarp. A few wet nights later the RCD
When I first bolted a black soldier fly larvae (BSFL) rearing tub to the side of the old dairy shed, I assumed a couple of heavy-duty brackets would be plenty. Six months later the western wall had pulled 15 mm out of plumb. The shed was built in the 1970s with unseasoned hardwood framing, and the constant damp weight of a 120-litre compost bay—feeding 10,000 larvae through a full Tasmanian summer—added roughly 90 kg of live load plus wet substrate that never quite dried out. The bottom plate of the wall wasn’t tied to the slab, just spiked into old red gum stumps that had shrunk. I ended up removing the bay, jacking the wall back, and sistering new 90×45 mm MGP10 treated pine studs either side of the original door opening.
Any permanent mounting needs to transfer weight directly to a concrete pad or a properly footed timber frame. That lesson cost me $140 in materials: two 20 kg bags of rapid-set concrete, four galvanised stirrups, and a 2.4 m length of 90×45 pine. I poured a small 600 mm × 600 mm × 100 mm footing with a couple of lengths of threaded rod cast in, then built a freestanding hardwood stand that doesn’t touch the shed wall at all. Standard practice for decks in Tassie is to go at least 100 mm below the topsoil with footings, but for a composter that size I went 200 mm because the ground here is reactive clay that heaves in winter. The stirrups are bolted to the concrete with M12 Dynabolts, which are rated for about 12 kN in tension in 25 MPa concrete—more than enough for a unit that will rarely exceed 150 kg.
If you’re working inside a roofed area like a carport, check the rafter connections before suspending anything. In 2019 I helped a mate near Cygnet set up a hanging BSF nursery from a couple of 75×50 mm Oregon purlins over an open bay. The purlins were nailed, not bolted, to the top plate, and the nails started pulling out within a month as the loaded basket swung. We replaced the nails with M10 coach screws and added a steel angle bracket at each joint, which cost around $35 all up. On a load-bearing wall, never notch a stud deeper than one-quarter of its depth, which for a standard 90 mm stud means no more than 22 mm, or you’ll compromise the lintel support above doorways. That rule comes straight out of AS 1684, and it’s worth remembering when you’re tempted to carve out a little recess for a tap or drainpipe.
Gas line installation or modification
When I looked at stringing enough solar to run the BSF nursery’s warming mat through a Tasmanian winter, I ran straight into the 120-volt DC extra-low-voltage ceiling defined in AS/NZS 3000. A single 370-watt Canadian Solar panel has an open-circuit voltage around 48 V, and three in series push the string well past 140 V before breakfast in June. That single choice—three panels instead of two—reclassified the entire DC circuit from ELV to Low Voltage, which in Australia means it stops being owner‑buildable. You need a licensed electrician, a compliant DC isolator at the array, and a paperwork trail.
I did the sums standing in the mud at the feed shed. Two panels in series would have kept everything ELV and I could have wired it myself on a Saturday using a $120 Tüv‑listed DC isolator and no call‑out fee. But the charge controller sat 40 metres from the panels, and at 24 V nominal the current would have been 28 amps in full sun. To stay under 3% voltage drop I would have needed 16 mm² twin‑core solar cable at roughly $12 per metre—close to $480 in cable. Three panels in series, charging a 48‑volt battery, dropped the current to 14 amps and let me use 6 mm² cable at $5.80 per metre, a cable bill of $232. The catch was the $95 ABB OTDC isolator with arc‑fault containment, a two-pole DC breaker box, and four hours of a sparky’s time at $110 per hour.
That warning finally made sense when the front verandah joist cracked under a black soldier fly bin I’d wrongly assumed was no heavier than a half-empty wheelie bin. The unit was a 220-litre food-grade barrel mounted on a plywood cradle, fed daily from the kitchen and the chook run. Wet feedstock, rain ingress through a badly sealed lid and larvae massing in one corner pushed the loaded weight past 160 kg. Bearers spaced at 450 mm centres over a 50 mm redgum deck, already sweating in Tassie’s winter damp, simply gave out. Replacing the broken 100 x 75 mm joist and three decking boards cost $210 in materials and burned an entire Sunday; sistering the remaining two bays added another $140 in galvanised M12 bolts and treated pine offcuts I had stored in the machinery shed. The tilting bin also sent leachate against the weatherboard wall, softening the bottom plate until a corner of the laundry floor dipped 8 mm. Pumping out the crawlspace, drying the subfloor with a borrowed industrial fan and packing a new H3-treated sole plate took a fortnight and a $460 plumber’s call-out to refix the waste pipe that had pulled from its fall.
After that, the composter moved to a standalone pad at least three metres from any building, footings or fence line. The pad is four 500 x 500 x 50 mm reinforced concrete pavers bedded on a 150 mm compacted layer of 20 mm blue-metal gravel, which stops both subsidence and termite trails. Keeping the gravelled apron raked and the bin lid properly dogged down means runoff flows into a shallow swale planted with comfrey, not towards the house stumps. A 1000-litre shuttle tank now catches roof water for the processing bay, because drawing from the house tank risked backflow contamination if the float valve ever stuck. Standard practice for any heavy wet system in a bush setting is to treat it like a small stock trough: allow at least a metre of clearance for maintenance, never bolt anything to a load-bearing structure, and assume a full bin will double its dry weight. The only permanent alteration I eventually permitted was a short hardwood stub post concreted 600 mm deep to hold the shade-cloth frame — and even that cost $47 in Quikset and a trip to the local salvage yard for an old ironbark strainer. On twelve acres there is always room to move the problem before the problem moves the house.
Always check local regulations and obtain necessary permits before commencing work.
In the video, Justin builds a cheap maggot bucket that converts kitchen scraps into a steady supply of protein‑rich larvae for his birds – that's the same end product my BSF composter yields, and he walks through every detail of the setup and harvest without any hype.— Fiona Gallagher
Frequently asked questions
How much does it cost to build a DIY black soldier fly composter?
The bin itself was only fourteen bucks from Bunnings — just a big black plastic tub. The rest is stuff most properties have lying around: a bit of scrap timber for a stand, a short length of PVC elbow, and a plastic bucket. All up my build came in well under fifty dollars.
Will a black soldier fly composter work through a cold winter?
They thrive in the warmth and really crank once the day sits above about twenty-two degrees. Below roughly fifteen they slow right down and you'll barely see any activity. Down here in southern Tasmania I treat winter as a quiet season and lean on the regular compost heap until spring warms back up.
What kitchen scraps can I put in a black soldier fly bin?
Anything plant-based goes in — onion skins, citrus pith, fruit the possums have already had a chew at, the usual veg peelings. My rule's simple: if I can't eat it, it goes to the chooks. I just stick to kitchen scraps and avoid anything meaty so the bin stays sweet.
How do you actually get the larvae out and into the chickens?
You don't scoop a thing — the larvae do the work themselves. Once they've eaten their fill they instinctively want to climb, so they head up the bin, slip through the PVC elbow near the top, and slide down a short ramp that tips straight into a bucket inside the chook run. The girls come running the second they hear them tap on the plastic.